Total of 17518 characters, estimated to take 44 minutes to read.
How to install v2ray in pagoda

location / { proxy_redirect off; proxy_pass http://127.0.0.1:31327; #WebSocket listening port proxy_http_version 1.1; proxy_set_header Upgrade $http_upgrade; proxy_set_header Connection "upgrade"; proxy_set_header Host $http_host; }V2Ray one-click installation script
v2ray one-click installation code (source)
bash <(curl -s -L https://git.io/v2ray.sh)Supports most V2Ray transmission protocols, WebSocket + TLS, HTTP/2, Shadowsocks, dynamic ports, integrated BBR and sharp speed optimization, etc.
Preface
V2Ray official website:https://www.v2ray.com
V2Ray is a very useful proxy software after Shadowsocks, but because V2Ray's configuration is slightly complicated and the GUI client is not perfect, V2Ray is not as popular as Shadowsocks among the scientific Internet users.
But I think, as a newbie like me, what I need more is a useful one-click installation script...
Therefore, this script is to make it easier for newbies like me to use V2Ray and configure V2Ray. I hope it will be helpful to you^_^
If you are an inexperienced beginner, please read this tutorial to build V2Ray:V2Ray build detailed graphic tutorial
Changelog
- 2018-01-28
The first complete version is released... - 2018-5-2
Support HTTP/2... I'm too lazy to post a version so I'll just write it here - 2018-5-26
Support Socks5… - 2019-1-5
Version v3 is even better. Happy New Year!
This is a tip
It's really boring, what's the point of bothering? If you are worried about your IP being blocked, I suggest you buy Just My Socks from BandwagonHost and use it for now.Automatically change IP when blocked, no need to worry about IP being blocked!Just My Socks is an agent service produced by BandwagonHost. It has reliable quality, high-quality CN2 GIA lines, and supports refunds, so you can rest assured.
Kind tips
This script does no mining, no mining, no mining. I'm sorry... it was just a joke
The script is open source, open source address: https://github.com/233boy/v2ray
Features
- Supports most V2Ray transmission protocols
- Support WebSocket + TLS / HTTP/2
- Support dynamic ports (except WebSocket + TLS, Socks5, HTTP/2)
- Supports blocking ads
- Support for configuring Shadowsocks
- Support downloading client configuration files (can be downloaded without Xshell)
- The client configuration file supports both SOCKS and HTTP
- Supports generating V2Ray configuration QR code links (only applicable to some clients)
- Support generating V2Ray configuration information links
- Support generating Shadowsocks configuration QR code link
- Support modification of V2Ray transmission protocol
- Support modifying V2Ray port
- Support modifying dynamic ports
- Support modifying user ID
- Support modifying TLS domain name
- Support modifying Shadowsocks port
- Support modifying Shadowsocks password
- Support modification of Shadowsocks encryption protocol
- Automatically enable BBR optimization (if supported by kernel)
- Integrated optional installation of BBR (by teddysun.com)
- Integrated optional installation of Ruisu (by moeclub.org)
- One-click to view running status/view configuration information/start/stop/restart/update/uninstall/etc...
- User-friendly wizard & clean installation & complete uninstallation
Hahahaha..I deliberately wrote 23 of them. Of course, all scripts will have the functions mentioned above.
Install or Uninstall
Warm reminder, this script blocks some unfriendly websites by default! (only related to wheels)
Requirements: Ubuntu 16+ / Debian 8+ / CentOS 7+
It is recommended to use Debian 9 system, the script will automatically enable BBR optimization.
Note: Debian 8 is not recommended because Caddy may cause some strange problems when applying for certificates.
We recommend using BandwagonHost VPS, which is stable, fast, and optimized for Chinese lines. You don’t have to worry about it running away, the service is good, and it supports refunds.
Here you can find Complete list of VPS packages , the discount code is here: VPS Discount Code
Use the root user to enter the following command to install or uninstall
bash <(curl -s -L https://git.io/v2ray.sh)
If you get the message curl: command not found, it's because your VPS doesn't have Curl installed.
How to install Curl on Ubuntu/Debian:apt-get update -y && apt-get install curl -y
How to install Curl on centos system:yum update -y && yum install curl -y
After installing curl, you can install the script
Note: After installation, enter v2ray You can manage V2Ray
If it prompts that your system does not support this script, please try to change the system
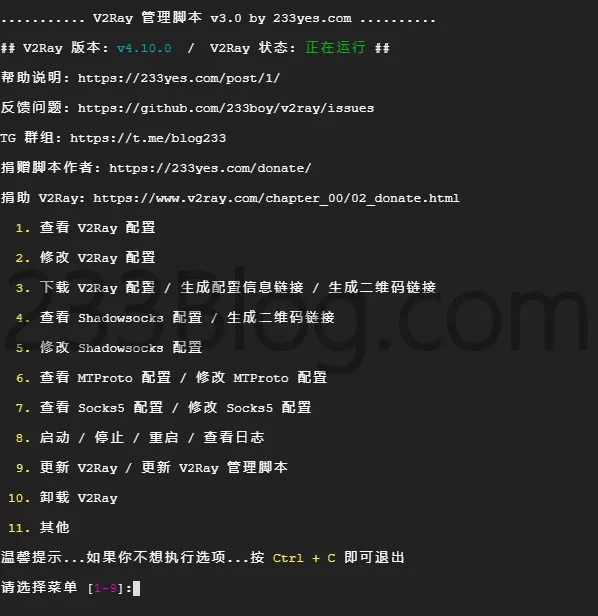
Here are some screenshots of this script
Installation Options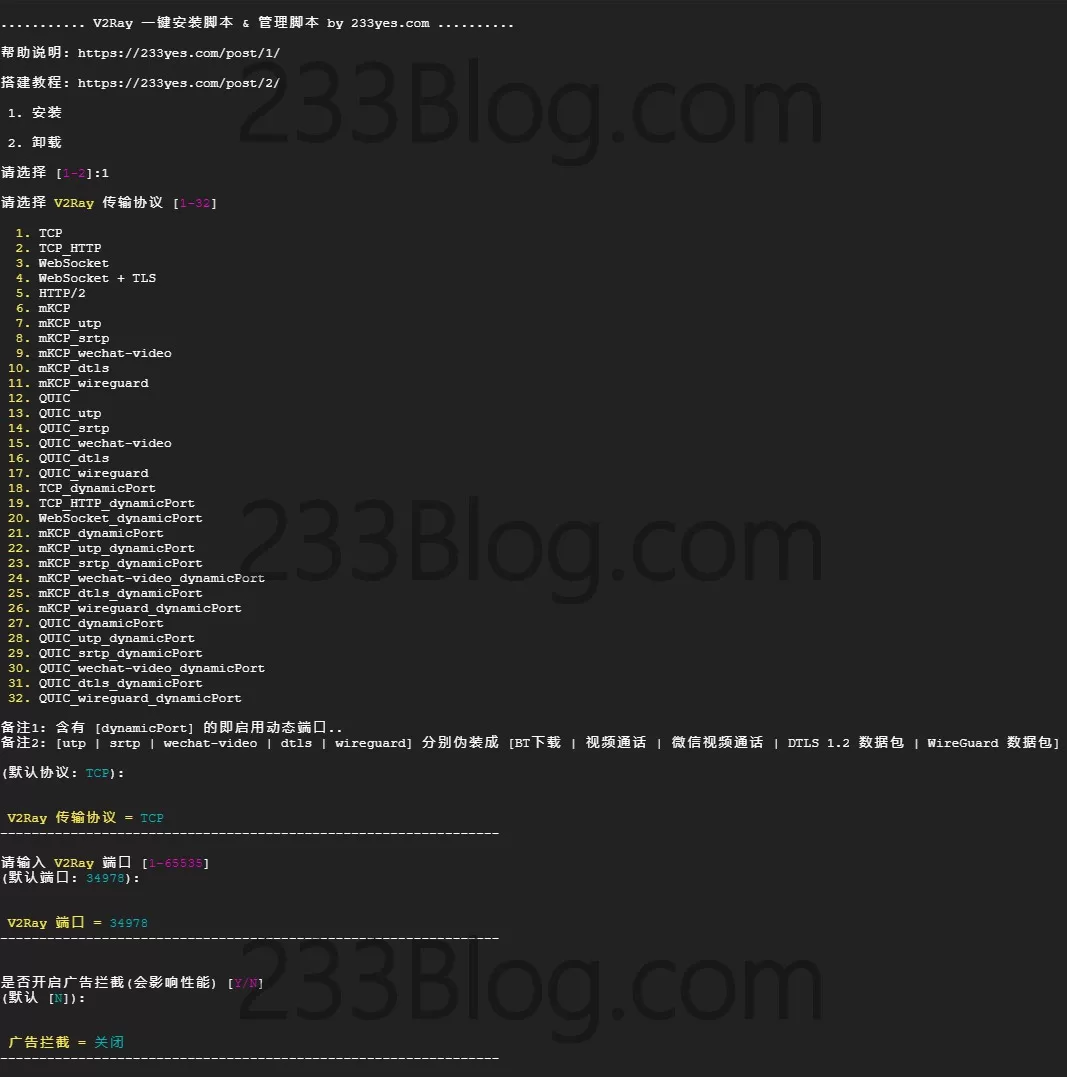
Configure Shadowsocks
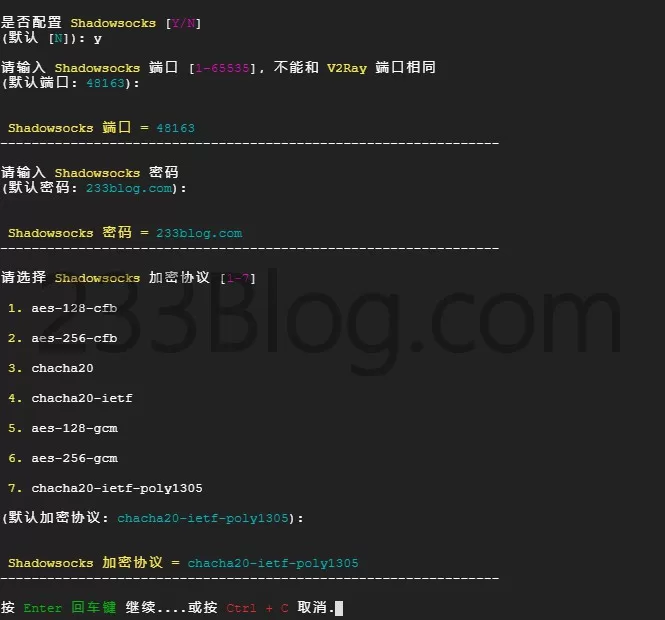
Installation Complete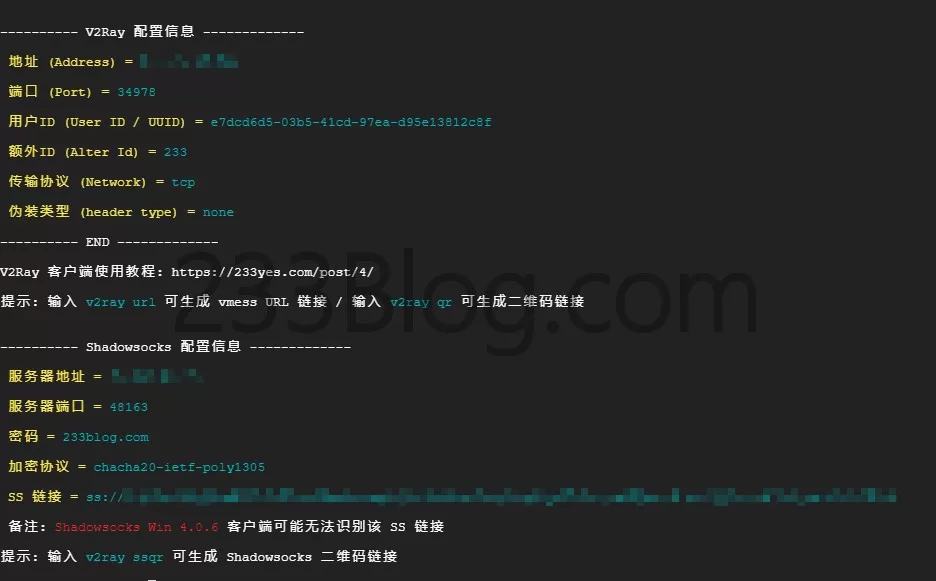
Admin Panel
Telegram Proxy
If you are using Telegram, you can configure a dedicated proxy for Telegram, so that in some cases you don't need to open another proxy software.
enter v2ray tg You can configure TG dedicated agent
Configure Telegram MTProto
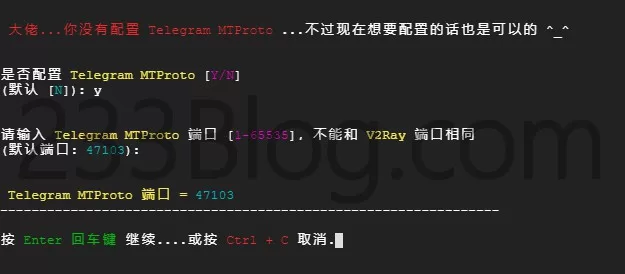
Telegram MTProto configuration information
Quick Management
v2ray info View V2Ray configuration informationv2ray config Modify V2Ray configurationv2ray link Generate V2Ray configuration file linkv2ray infolink Generate V2Ray configuration information linkv2ray qr Generate V2Ray configuration QR code linkv2ray ss Modify Shadowsocks configurationv2ray ssinfo View Shadowsocks configuration informationv2ray ssqr Generate Shadowsocks configuration QR code linkv2ray status View V2Ray running statusv2ray start Start V2Rayv2ray stop Stop V2Rayv2ray restart Restart V2Rayv2ray log View V2Ray running logv2ray update Update V2Rayv2ray update.sh Update V2Ray management scriptv2ray uninstall Uninstall V2Ray
Configuration file path
V2Ray configuration file path: /etc/v2ray/config.json
Caddy configuration file path: /etc/caddy/Caddyfile
Script configuration file path: /etc/v2ray/233blog_v2ray_backup.conf
Warning, please do not modify the script configuration file to avoid errors.
If you don't have special requirements, don't modify the V2Ray configuration file.
But it's okay, if you really want to mess around, if something goes wrong, just uninstall, then reinstall, then make another mistake, then uninstall again, then reinstall again, repeat until you don't want to mess around anymore.
WS+TLS / HTTP2
If you use these two protocols, the Caddy integration that comes with the script will be used
In any case, it is not recommended to directly modify the Caddy configuration: /etc/caddy/Caddyfile
If you need to configure other websites, please put the website's configuration files in the /etc/caddy/sites directory, and then restart the Caddy process. The Caddy configuration generated by the script by default will load all configuration files in the /etc/caddy/sites directory.
So, please put your website configuration files in the /etc/caddy/sites directory. There is no need to change /etc/caddy/Caddyfile at all.
Remember to restart the Caddy process: service caddy restart
Caddy plugin related
This script integrates Caddy, but does not integrate any Caddy plugins. If you need to install some Caddy plugins, you can use the official Caddy installation script to install them in one click.
The installation path of Caddy integrated in my script is consistent with the official installation script of Caddy. So you can install it directly without any problems.
For example, to install Caddy with the http.filebrowser plugin, execute the following command:
curl https://getcaddy.com | bash -s personal http.filebrowser
You can https://caddyserver.com/download Find more Caddy plugins and installation commands.
Remark
The SOCKS listening port of the V2Ray client configuration file is 2333, the HTTP listening port is 6666
Some V2Ray clients may have slightly different options or descriptions, but in fact, the V2Ray configuration information displayed by this script is detailed enough. Due to the differences in clients, please take it as it is.
Feedback
Please check first:V2Ray one-click installation script question collection
Telegram Group: https://t.me/blog233
Github Feedback: https://github.com/233boy/v2ray/issues
If you have any questions about V2Ray, please report them to the official V2Ray website.
Currently only supports configuring one V2Ray account...one Shadowsocks account. . SSR is not supported. .
When using a VPS from an international manufacturer, please open the port and UDP protocol in the security group (firewall) (if you want to use a transport protocol containing mKCP)
Backup
In order to avoid the script being deleted by me due to force majeure, it is recommended that you fork this script.
Backup address: https://github.com/233boy/v2ray/fork
To install, make sure you have forked the script and change 233boy to your Github username.
git clone https://github.com/233boy/v2ray -b master cd v2ray chmod +x install.sh ./install.sh local
If it says that the git command is not available, then install it yourself. Don't know how to install it? I don't know either. Haha
Update scripts in a timely manner
To ensure you enjoy your use, please use v2ray update.sh command to update the management script.
Scripts are bound to have bugs, so it is recommended to check for updates when you have time.
Follow the latest script updates
I will be Telegram Announcement Channel Push script latest updates, if you use Telegram, you can follow it.
Of course, you can also join Our Telegram Group Come and blow water.
Funding V2Ray
If you think V2Ray is useful and can solve some of your problems, please consider Funding V2Ray Development .
grateful
V2Ray: https://www.v2ray.com/
copyright
This script is shared under the GPL v3 license.
share
If you find the script useful, please share it with your friends.
other
Please do not violate national laws and regulations, otherwise you will bear the consequences at your own risk!
Using a one-click script will not harm you, and will save you a lot of time. Tools are always for solving problems faster.
Solve the problem of 233blog website v2ray one-click installation script blocking the website (I)
When building a v2ray server, many netizens will choose the one-click script on the 233blog website. The script is simple and easy to use. However, netizens reported that the author of the script added a blocking setting for conscientious media websites such as Epoch Times and New Tang Dynasty. Here is a guide to remove it.
We have introduced several methods before, but some netizens said they are not easy to remember. Here is a simpler method, just remember three shortcut keys.
In many cases, we need to edit the text content in the server. The most commonly used text editors are vi or vim, which many people find difficult to use. Here we introduce a simple and easy-to-use text editor nano, which is much simpler than vim and easy to use. We will use nano to modify the v2ray configuration file, which is easier to operate and remember.
If there is no nano command, install it using the following command
#CentOS system
yum -y install nano
# Debian/Ubuntu system
apt-get install -y nano
After the installation is complete, enter the following command
nano /etc/v2ray/config.json
Use the arrow keys to find the following content:
"domain": [
“domain:epochtimes.com”,
"domain:epochtimes.com.tw",
“domain:epochtimes.fr”,
“domain:epochtimes.de”,
"domain:epochtimes.jp",
“domain:epochtimes.ru”,
"domain:epochtimes.co.il",
"domain:epochtimes.co.kr",
"domain:epochtimes-romania.com",
"domain:erabaru.net",
“domain:lagranepoca.com”,
"domain:theepochtimes.com",
“domain:ntdtv.com”,
"domain:ntd.tv",
“domain:ntdtv-dc.com”,
"domain:ntdtv.com.tw",
"domain:minghui.org",
"domain:renminbao.com",
"domain:dafahao.com",
"domain:dongtaiwang.com",
“domain:falundafa.org”,
"domain:wujieliulan.com",
"domain:ninecommentaries.com",
“domain:shenyun.com”
],
Place the cursor on the first line of the content in the brackets [ ] (i.e. "domain:epochtimes.com"), and repeatedly use ctrl+k (the shortcut key function: cut the line where the cursor is) to delete one line at a time. When only one line is left, stop deleting and use the arrow keys to move to the website domain name to modify it. You can modify it to a domestic website or a website that does not exist at all.
Then use the ctrl+o shortcut key to save. When using this shortcut key, a line of English will appear at the bottom of the window prompting whether to save. Just press Enter.
Finally, use ctrl+x to exit the editing of the config.json file. Of course, after modifying the configuration, you need to restart the v2ray service for it to take effect (you can use service v2ray restart to restart or enter v2ray, press Enter, select 8 first, and then select 3 to restart).
Solve the problem of 233blog website v2ray one-click installation script blocking the website (Part 2)
The solution this time is to modify the v2ray configuration file directly after the installation is complete.
First, follow the original one-click script to build and install. After the installation is complete, copy and paste the following command in the command prompt and press Enter to execute.
sed -ri 's/(domain:)[^”]*/\1qq.com/' /etc/v2ray/config.json && service v2ray restart >/dev/null 2>&1
The command means to modify the v2ray configuration file directly, change all blocked website domains to qq.com, and then restart v2ray. Without restarting, the new configuration will not take effect.
Xray one-click installation script
The best Xray one-click installation script & management script
introduce
The best Xray script
Github address:https://github.com/233boy/Xray
Features
- Quick installation
- Invincible and easy to use
- Zero learning cost
- Automated TLS
- Simplify all processes
- Block BT
- Block Chinese IP
- Using API Operations
- Compatible with Xray commands
- Powerful shortcut parameters
- Supports all common protocols
- One-click to add Shadowsocks 2022
- One-click to add VMess-(TCP/mKCP/QUIC)
- One-click addition of VMess-(WS/H2/gRPC)-TLS
- One-click addition of VLESS-(WS/H2/gRPC)-TLS
- Add Trojan-(WS/H2/gRPC)-TLS in one click
- One-click to add VLESS-XTLS-uTLS-REALITY
- One-click to add VMess-(TCP/mKCP/QUIC) dynamic ports
- One-click to enable BBR
- Change the disguised website with one click
- One-click change (port/UUID/password/domain name/path/encryption method/SNI/dynamic port/etc...)
- And much more…
Design Concept
The design concept is:High efficiency, super fast, easy to use
The script is based on the author's own usage needs. Multiple configurations running simultaneously Designed for the core
And specially optimized, add, change, view, delete, these four common functions
You only need one command to complete operations such as adding, changing, viewing, deleting, etc.
For example, adding a configuration takes less than 1 second! It's added in a flash! The same goes for other operations!
The script parameters are very efficient and super easy to use. Please master the use of parameters.
Please read the script parameters carefully and you will find that it can be so wonderful.
Supported protocols list
- VMess-TCP
- VMess-mKCP
- VMess-QUIC
- VMess-H2-TLS
- VMess-WS-TLS
- VMess-gRPC-TLS
- VLESS-H2-TLS
- VLESS-WS-TLS
- VLESS-gRPC-TLS
- VLESS-XTLS-uTLS-REALITY
- Trojan-H2-TLS
- Trojan-WS-TLS
- Trojan-gRPC-TLS
- Shadowsocks
- VMess-TCP-dynamic-port
- VMess-mKCP-dynamic-port
- VMess-QUIC-dynamic-port
Building Tutorial
If you are a beginner, please see:Xray build detailed graphic tutorial
Install
System support: Ubuntu, Debian, CentOS. Ubuntu 22 is recommended. Use CentOS with caution, as the script may not run properly!
Execute the following command:
bash <(wget -qO- -o- https://github.com/233boy/Xray/raw/main/install.sh) -v v1.8.1illustrate:-v v1.8.1 The parameter specifies the use of Xray v1.8.1 version, in order to better use the VLESS-XTLS-uTLS-REALITY protocol
Since the latest version of Xray is v1.7.5 (2023-5-13), if you do not specify the version number, v.1.7.5 will be downloaded.
But if Xray is updated to a new version at that time, you don’t need to specify the installation version number;
Installation Complete
When you execute the above installation command and there is no error prompt, you will see a picture similar to the following
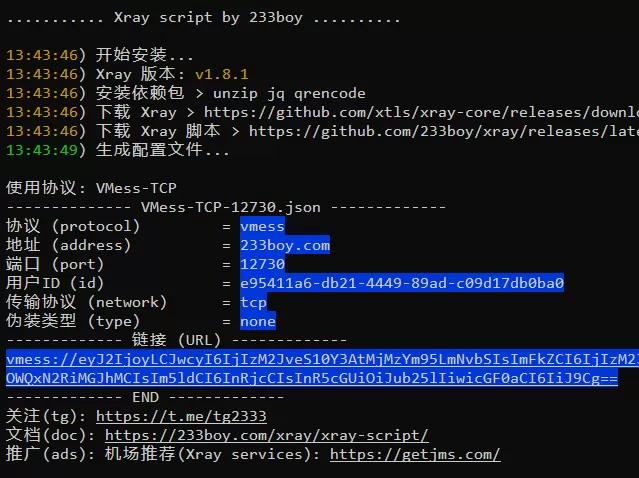
The script specifically creates a time display to give feedback to detect the installation time...
Theoretically, in most cases the installation will be completed within 15 seconds, and if conditions permit, it can be completed in just one second!
To facilitate your quick use, the script will automatically create a VMess-TCP configuration after the installation is complete.
At this point you can copy the URL to related software (such as v2rayN) to test whether it works properly.
If it doesn't work, try using xray add ss auto auto aes-256-gcm Add a SS to test again
Admin Panel
After the installation is complete, enter xray You can see the management panel, as shown in the following picture
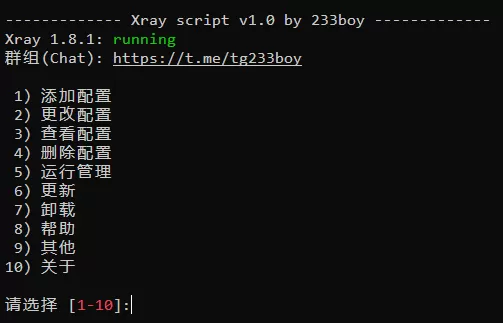
Tip: If you don’t want to execute any functions, just press Enter to exit.
not available
There are generally two reasons why it cannot be used: one is that it cannot connect to the port, and the other is that there is a problem with the client kernel support.
If your VPS has an external firewall, please make sure you have opened the ports
Test whether the port can be connected:
Open:https://ping.sx/check-port
Write your VPS IP in Target and V2Ray port in Port, then click CheckIf REACHABILITY shows Timeout, that is, the port cannot be connected
Reminder, you can use xray ip Check the VPS IP.
To disable the firewall, execute the following command:
systemctl stop firewalld; systemctl disable firewalld; ufw disable
After turning off the firewall, test whether the port is connected. If not, you may have an external firewall that is not turned off. You must be able to connect to the port before you can use it normally.
If REACHABILITY shows Reachable That means you can connect to the port, then continue
use xray add ss auto auto aes-256-gcm Add a SS to see if it can be used normally. If it can be used normally, it proves that there is no problem with the operation.
Reminder: the default installed Xray kernel is the latest version
If it doesn't work, your client's kernel may be too old.
Please try to use different clients for testing; such as v2rayN; v2rayNG, etc.
Please try to set VMessAEAD, some clients will have related options
Some clients need to fill in the additional id (alterid) as 0; for example, the garbage Apple stuff
Please update your client Xray kernel to be consistent with the server version!
Quick Start
Xray scripts simplify many processes. For example, we often use (add, change, view, delete) configuration. The following content allows you to quickly master the use
Add configuration:
xray add-> Add configurationxray add reality-> Add a VLESS-XTLS-uTLS-REALITY configurationxray add reality 443 auto dl.google.com-> Same as above, custom parameters: port 443, SNI dl.google.comxray add ss-> Add a Shadowsocks 2022 configurationxray add tcp-> Add a VMess-TCP configurationxray add kcpd-> Add a VMess-mKCP-dynamic-port dynamic port configuration
Note, use xray add When adding configurations, only the TLS-related protocol configurations require a domain name, and the rest can be handled automatically.
For more information about add parameters, see the add description below.
–
Change the configuration:
xray change-> Change configurationxray changes reality-> Change REALITY related configurationxray change reality sni 1.1.1.1-> Change the SNI of REALITY related configuration to 1.1.1.1, you can also usexray sni reality 1.1.1.1xray change tcp-> Change TCP related configurationxray change tcp port auto-> Change the port of TCP related configuration. The port is automatically created or you can usexray port tcp autoxray change kcp id auto-> Change the UUID of mKCP related configuration. The UUID is automatically created or you can usexray id tcp auto
For more information about the change parameter usage, see the change description below.
–
View the configuration:
xray info-> View configurationxray info REALITY-> View REALITY related configurationxray info tcp-> View TCP related configuration
–
Delete the configuration:
xray del-> Delete configurationxray del REALITY-> Delete REALITY related configurationxray del tcp-> Delete TCP related configuration
Reminder: Use del parameter with caution
–
Great! You have mastered the most commonly used functions (add, modify, view, delete)
add / change / info / del : add, change, view, delete
For most users
use xray add Add configuration, use xray change xray info xray del to (change, view, delete) the configuration.
Reminder: If only one configuration is matched, it will be automatically selected. Otherwise, a list of matched configurations will be displayed, requiring you to select one of them.
add
add is a parameter used to add configuration
Note: Optional parameters are used auto Instead, let the script automatically handle the relevant parameters
usage:xray add [protocol] [args... | auto]
Example:
xray addxray add h2xray add wsxray add ssxray add tcpxray add kcpdxray add reality
Remind, when Optional parameters When it does not exist, the default is auto, and only the domain names configured with the *TLS protocol cannot be processed automatically.
For example,xray add tcp equal xray add tcp auto auto auto
–
The optional parameters are described in detail as follows:
Add a VLESS-XTLS-uTLS-REALITY configuration
Optional parameters: port, UUID, SNI
usage: xray add reality [port] [uuid] [sni]
Example:
xray add realityxray add reality 443 auto dl.google.com-> Use port 443 and SNI dl.google.com
–
Add a Shadowsocks configuration
Optional parameters: port, password, encryption method
usage:xray add ss [port]
There is hidden content here, which can only be seen after entering the password correctly!
[method]
Example:
xray add ssxray add ss auto auto 2022-blake3-aes-128-gcm-> Encryption method uses 2022-blake3-aes-128-gcmxray add ss 233 233boy aes-128-gcm-> Use port 233, password 233boy.com, encryption method aes-128-gcm
–
Add a Socks configuration
Optional parameters: port, password, encryption method
usage:xray add socks [port] [username]
There is hidden content here, which can only be seen after entering the password correctly!
Example:
xray add socksxray add socks 233 233boy 233boy.com-> Use port 233, username 233boy, password 233boy.com
–
Add a VMess-(TCP/mKCP/QUIC) configuration
Optional parameters: port, UUID, masquerade type
usage:xray add [tcp | kcp | quic] [port] [uuid] [type]
Example:
xray add tcp-> Add a VMess-TCP configurationxray add kcp-> Add a VMess-mKCP configurationxray add quic-> Add a VMess-QUIC configurationxray add tcp 233 auto http-> Use port 233 and use http for disguise typexray add kcp 234 auto dtls-> Use port 234 and masquerade type dtlsxray add quic 235 auto wechat-video-> Use port 235 and camouflage type wechat-video
–
Add a VMess-(TCP/mKCP/QUIC) dynamic port configuration
Optional parameters: port, UUID, masquerade type, dynamic start port, dynamic end port
usage:xray add [tcpd | kcpd | quicd] [port] [uuid] [type] [start] [end]
Example:
xray add tcpd-> Add a VMess-TCP dynamic port configurationxray add kcpd-> Add a VMess-mKCP dynamic port configurationxray add quicd-> Add a VMess-QUIC dynamic port configurationxray add tcpd 223 auto http 2333 3333-> Use port 233, masquerade type http, dynamic port 2333-3333xray add kcpd auto auto dtls 2333 2444-> Masquerade type uses dtls, dynamic ports 2333-2444xray add quicd 456 auto dtls 4567 5678-> Use port 456, masquerade type dtls, dynamic port 4567-5678
–
Add a VMess-(WS/H2/gRPC)-TLS configuration
Optional parameters: domain name, UUID, path
usage: xray add [ws | h2 | grpc] [host] [uuid] [path]
Example:
xray add ws-> Add a VMess-WS-TLS configurationxray add h2-> Add a VMess-H2-TLS configurationxray add grpc-> Add a VMess-gRPC-TLS configurationxray add ws 233boy.com-> The domain name used is 233boy.comxray add h2 233boy.com auto /h2-> The domain name is 233boy.com and the path is /h2xray add grpc 233boy.com auto /grpc-> The domain name is 233boy.com and the path is /grpc
–
Add a VLESS-(WS/H2/gRPC)-TLS configuration
Optional parameters: domain name, UUID, path
usage: xray add [vws | vh2 | vgrpc] [host] [uuid] [path]
Example:
xray add vws-> Add a VLESS-WS-TLS configurationxray add vh2-> Add a VLESS-H2-TLS configurationxray add vgrpc-> Add a VLESS-gRPC-TLS configurationxray add vws 233boy.com-> The domain name used is 233boy.comxray add vh2 233boy.com auto /h2-> The domain name is 233boy.com and the path is /h2xray add vgrpc 233boy.com auto /grpc-> The domain name is 233boy.com and the path is /grpc
–
Add a Trojan-(WS/H2/gRPC)-TLS configuration
Optional parameters: domain name, UUID, path
usage: xray add [tws | th2 | tgrpc] [host] [uuid] [path]
Example:
xray add tws-> Add a Trojan-WS-TLS configurationxray add th2-> Add a Trojan-H2-TLS configurationxray add tgrpc-> Add a Trojan-gRPC-TLS configurationxray add tws 233boy.com-> The domain name used is 233boy.comxray add th2 233boy.com auto /h2-> The domain name is 233boy.com and the path is /h2xray add tgrpc 233boy.com auto /grpc-> The domain name is 233boy.com and the path is /grpc
–
remind,xray add [protocol] of protocol You can also change the complete protocol name. See the supported protocol list above for the name.
For example,xray add Shadowsocks and xray add ss It is the same, but of course it is better to use a simplified name, which is simple and easy to remember.
Again, optional parameters are automatically handled by default when they are not present (except for the *TLS configuration which requires a domain name), so you can omit the optional parameters if they are not necessary.
Therefore, in most cases, you only need to add the protocol, for example: xray add tcp,xray add kcp,xray add kcpd
no-auto-tls
The no-auto-tls parameter is used the same as the add parameter, but it disables automatic configuration of TLS and can be used for *TLS related protocols
usage:xray no-auto-tls [protocol] [args... | auto]
Example:
xray no-auto-tlsxray no-auto-tls wsxray no-auto-tls vh2 233boy.comxray no-auto-tls tgrpc 233boy.com
Note: Use this option if you want to configure TLS manually, for example if you want to use NGINX to implement TLS.
Help instructions:Xray script no-auto-tls parameter help
[name]
Imagine if you have 233 VMess-TCP configurations, how can you quickly select one of them?
When you have multiple configurations, you can use [name] Keywords are used to match related configurations for quick execution Change, View, Delete Wait for operation
Recommended use port or domain name To match, it is easier to filter related configurations.
Please see below for the [name] Examples
Reminder: If only one configuration is matched, it will be automatically selected. Otherwise, a list of matched configurations will be displayed, requiring you to select one of them.
change
change is a parameter used to change the configuration
usage: xray change [name] [option] [args... | auto]
Reminder: Different configurations provide different options for changes.
[option] Name and option description parameters are as follows:
| name | Optional parameters | use | auto |
|---|---|---|---|
| dp, dynamicport | [start] [end] | Changing Dynamic Ports | yes |
| full | […] | Changing multiple parameters | other |
| id | [uuid] | Changing UUID | yes |
| host | [domain] | Change Domain Name | – |
| port | [port] | Changing the Port | yes |
| path | [path] | Change Path | yes |
| passwd | [passowrd] | change password | yes |
| key | [Private key] [Public key] | Change Key | yes |
| type | [type] | Change camouflage type | yes |
| method | [method] | Change encryption method | yes |
| sni | [domain] | Change serverName | yes |
| seed | [seed] | Changing the mKCP seed | yes |
| new | […] | Changes to the Agreement | other |
| web | [domain] | Change the disguised website | – |
Note: If auto is supported, the optional parameters can be set to auto to automatically change the relevant parameters.
If auto is other, please refer to add parameter usage for optional parameters, full is similar to xray add Current protocol [...], new is similar to xray add [...]
Example:
xray change-> Change configurationxray change tcp-> Change a tcp related configurationxray change tcp port 233-> Change a TCP configuration port to 233xray change tcp port auto-> Change a TCP configured port and the port is automatically createdxray change kcp id auto-> Change the UUID of a mKCP configuration and the UUID is automatically createdxray change kcp dp auto-> Change a dynamic port configured by mKCP, and the dynamic port is automatically createdxray change kcp dp 233 332-> Change the dynamic port of a mKCP configuration to 233-332xray change tls host 233boy.com-> Change the domain name of a tls configuration to 233boy.comxray change tls web example.com-> Change a tls configured disguised website to example.comxray change reality sni 1.1.1.1-> Change the SNI of a reality configuration to 1.1.1.1
Note: [option] names can also be used directly.
usage:xray [option] [name] [...]
Example:
xray id-> Change UUIDxray port-> Change Portxray port tcp 233-> Change a TCP configuration port to 233xray id tcp-> Change the UUID of a tcp configurationxray id tcp auto-> Change the UUID of a tcp configuration, and the UUID is automatically createdxray dp kcp auto-> Change a dynamic port configured by mKCP, and the dynamic port is automatically createdxray dp kcp 233 332-> Change the dynamic port of a mKCP configuration to 233-332xray host tls 233boy.com-> Change the domain name of a tls configuration to 233boy.comxray web tls example.com-> Change a tls configured disguised website to example.comxray sni reality 1.1.1.1-> Change the SNI of a reality configuration to 1.1.1.1
There are many options for changing the configuration, so I will not list them one by one. In most cases, use
xray changeYou can
info
info is a parameter used to view the configuration
usage: xray info [name]
Example:
xray info-> View configurationxray info tcp-> View a tcp configurationxray info kcp-> View a kcp configurationxray info tls-> View a tls configuration
url
url is a parameter that generates a configured URL link
usage: xray url [name]
Example:
xray url-> View the configured URL linkxray url tcp-> View a TCP configuration URL linkxray url kcp-> View a kcp configured URL linkxray url tls-> View a tls configured URL link
qr
qr is a parameter used to generate a QR code for the configuration
usage: xray qr [name]
Example:
xray qr-> View the configured QR codexray qr tcp-> View a tcp configuration QR codexray qr kcp-> View a kcp configured QR codexray qr tls-> View a tls configuration QR code
del
del is a parameter used to delete the configuration
usage: xray del [name]
Example:
xray del-> Delete configurationxray del tcp-> Delete a tcp configurationxray del kcp-> Delete a kcp configurationxray del tls-> Delete a tls configuration
Use this option with caution
ddel
ddel is a parameter used to delete multiple configurations
usage: xray ddel [name...]
Example:
xray ddel-> Delete configurationxray ddel tcp kcp-> Delete one tcp and one kcp configuration at the same time
Reminder: Here [name] Deletion will only be performed if the matching related configuration is unique.
For example, suppose you currently have two tcp configurations, using xray ddel tcp It will not delete any files
Use this option with caution
gen
The gen parameter is used in the same way as the add parameter, but the gen parameter only returns JSON content and does not create a configuration. It is only for testing purposes.
usage:xray gen [protocol] [args... | auto]
Example:
xray gen ssxray gen tcpxray gen kcpdxray gen reality 2333xray gen ws 233boy.com
genc
The genc parameter is used to view the applicable client outbounds JSON and is only for testing purposes.
usage:xray genc [name]
Example:
xray genxray gen tcp
Reminder, you can also use xray client , which has the same effect as genc.
bbr
The bbr parameter enables BBR optimization.
use: xray bbr
bin
The bin parameter directly calls the Xray core to run related commands. This parameter is fully compatible with all Xray commands.
usage:xray bin [...]
Example:xray bin help
Default compatible commands: api, x25519, tls, run, uuid
Example:xray x25519
xapi
The xapi parameter is similar to xray api, but the API backend uses the currently running Xray server
usage:xray xapi [...]
Example:xray xapi statsquery
fix-config.json
The fix-config.json parameter is used to fix the config.json file
use: xray fix-config.json
update
The update parameter is used to update
usage:xray update [core | sh | caddy] [ver]
Example:
xray update-> Update corexray update core-> Update corexray update core v1.8.1-> Update the core to use v1.8.1xray update sh-> Update scriptxray update caddy-> Update Caddy
log
The log parameter is used to view the real-time log of Xray operation.
use:xray log
status
status is a parameter to check the running status
use:xray status
start, stop, restart
start, stop, restart are parameters for managing Xray start, stop, and restart
usage:xray [start | stop | restart] [caddy]
Example:
xray restart-> Restart Xrayxray restart caddy-> Restart Caddy
reinstall
reinstall is the parameter of the reinstall script
use: xray reinstall
uninstall
uninstall is a parameter for the uninstall script
use:xray uninstall
help
Oops, I don't want to write anymore. For other parameter usage, please check the help.
use:xray help
Table of contents
All Xray scripts are stored in /etc/xray
Script: /etc/xray/sh
Core: /etc/xray/bin
Configuration: /etc/xray/conf
Don't ask why I don't comply with XXX rules, because I would rather comply with the one-click deletion concept.
Friendly reminder
If you add *TLS protocol configuration, be sure to set up a disguised website, using xray web tls Quickly set up a camouflaged website
Disguised website
A camouflaged website is a reverse proxy, which means that when you open your own domain name, the content from the camouflaged website is displayed.
Automatic TLS Description
Xray script automatic TLS help instructions
Using Cloudflare to forward Xray traffic
Using Cloudflare to forward Xray traffic can prevent IPs from being blocked, and can also save blocked IPs.
Preface
Generally speaking, unless you really need it, it is not recommended to use CF, because the transfer speed of CF is too slow.
The speed of using Cloudflare for transit is relatively slow. This is due to line problems and there is no solution.
However, if you use a mobile network, you may use the Cloudflare Hong Kong node, which theoretically will have a good speed.
Only if you are worried that your IP is blocked or has been blocked, it is recommended to use CF to transfer traffic.
Installation Script
If already installed, skip this section.
Log in to your VPS; execute the following command:
bash <(wget -qO- -o- https://github.com/233boy/Xray/raw/main/install.sh) -v v1.8.1If the installation is successful, continue
Prepare
Must own a domain name.
Open: https://dash.cloudflare.com/sign-up
Register a Cloudflare account. If you have an account, log in.
Add a domain
After successful registration, log in
For easier understanding, you can switch the language to Simplified Chinese in the Cloudflare background; and click Add Site

Then, enter your domain name and add the site

Select the Free plan and continue

We will now add a DNS record named:ai, IPv4 address:Enter your VPS IP, the proxy status must be off and the cloud icon is gray.
Tip: You can use xray ip Check your VPS IP.

Cloudflare will automatically scan the DNS of the domain name. The display here may be different. Anyway, make sure that the proxy status of the record you just added is closed. Continue
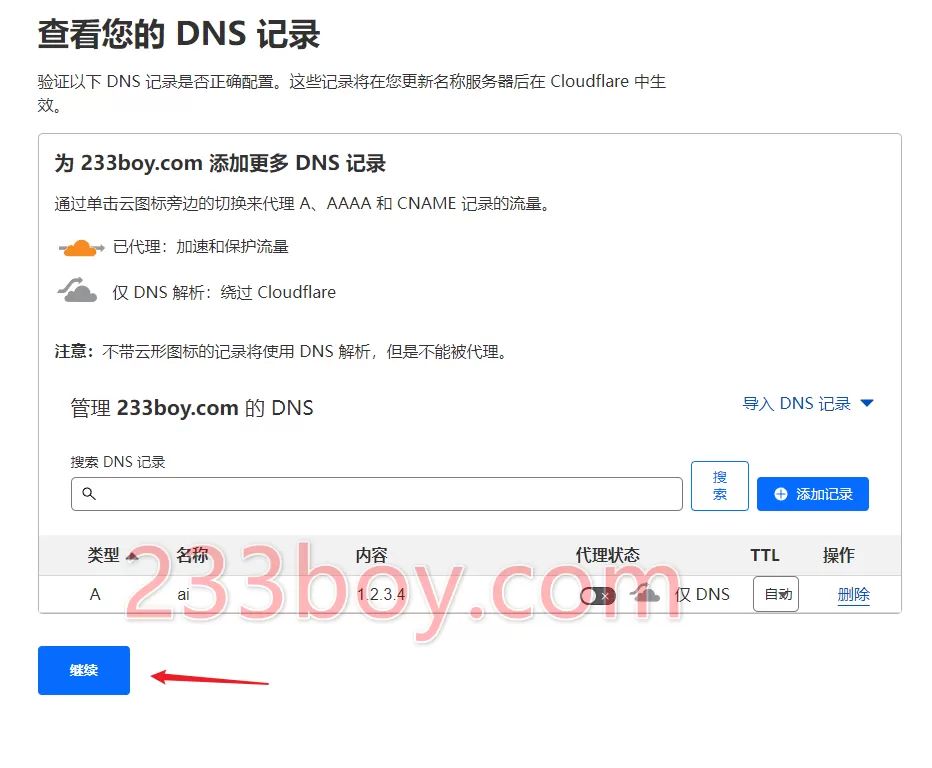
Change the Name Servers of the domain name to Cloudflare. There are two sets of servers. The operation of different domain name service providers may be slightly different. Here is how to do it yourself.

After changing the domain name's Name Servers, click,Done, check name servers
Waiting for effect
There will be a delay in the time it takes for the Name Servers of the domain name to take effect, so just be patient and wait.

On the Cloudflare backend homepage, if you can see the domain name displayed below efficient, that is effective
The domain name is effective, which means that the domain name is officially hosted and managed by Cloudflare.
Adding a transfer configuration
Log into your VPS
use xray add ws ai.233boy.com Add a vmess-ws-tls configuration; remember to ai.233boy.com Change to your domain name
It is the domain name you just added the record. Suppose your domain name is 233boy.com, and the name you added is ai, the domain name is ai.233boy.com

If the addition is successful, a configuration similar to the picture will be displayed
Start transfer
On the Cloudflare backend homepage, click on your domain name and select SSL/TLS

Change the SSL/TLS encryption mode to completely
Then select from the options menu on the left. DNS

Edit the added record and turn on the proxy status. Already agent, the cloud icon is lit, then save

This is what it looks like after the change, proxy status, proxied, the cloud icon is lit.
alright
After lighting up the cloud, the traffic will be transferred through Cloudflare.
Reminder: If the cloud icon is lit, the traffic is transferred through Cloudflare. If the cloud icon is grayed out, it is a direct connection without Cloudflare transfer.
Speed Test
You see, this speed is okay, right?
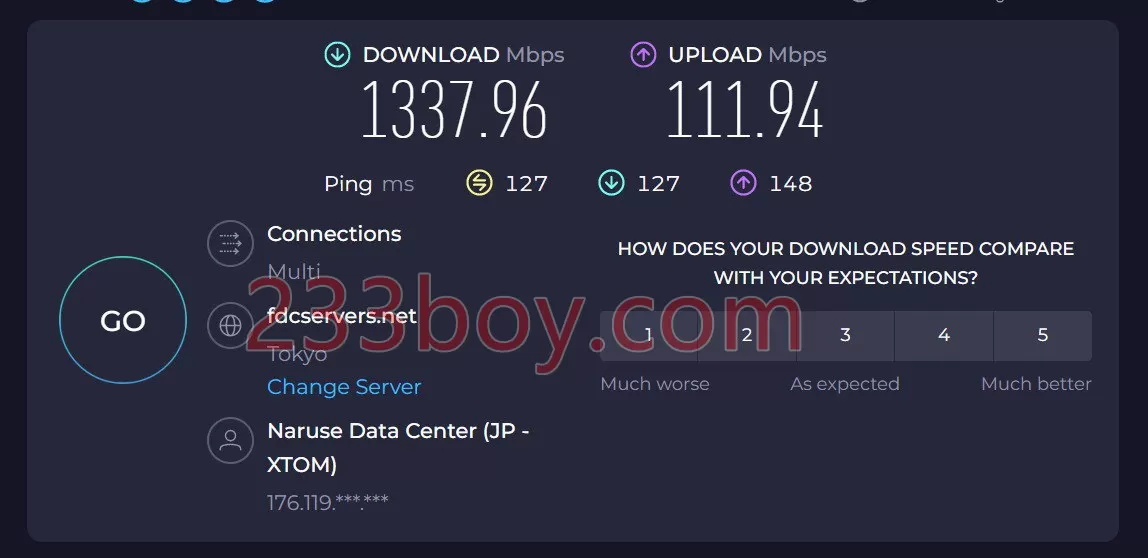
Impossible, absolutely impossible (false
Remark
If your VPS is located on the west coast of the United States, the speed should be OK. If it is not on the west coast of the United States, then the speed may be very slow.
But the good thing is that it can prevent the IP from being blocked, or bring the IP back to life, which is also good, isn’t it?
If you use a mobile network, Cloudflare's transit node may be in Hong Kong, and the speed may be good (not guaranteed).
other
When adding a DNS record, you can use any name you want, as long as it resolves to your VPS IP. When adding the forwarding configuration, just write your domain name.
We just used the name ai as an example
Those who understand understand
The article only demonstrates the use of vmess-ws-tls for forwarding. Other *TLS protocols can also be used for forwarding, but I don't want to write it anymore. Please, brother, be smart!
Tip: Remember to select network Turn on all the options, such as gRPC
You can also switch to the vless-ws-tls protocol, which may be a billion times faster!
I don't understand, so forget it!
Optimize for speed
You can choose the preferred Cloudflare IP. I haven't done it and I don't need to. After all, my speed test result is good and it's enough.
Xray Script Description
Please see:The best Xray one-click installation script
Oops, although the script is very useful, but in order for you to better understand and master various usage techniques, it is still recommended to take a look at it!
Finish
It’s such a simple thing, but if you can’t understand it, I suggest you smash your computer and then apply for kindergarten.
The plagiarist who copied and pasted my article has no dick!
(This curse is too much, I just saved it in my blog and noted the source. Too many websites have closed down, I am afraid I will not have the chance to read it, (#^.^#))
Discover more from Li yingjie Pests
Subscribe to get the latest posts sent to your email.


![[litu100] ID.066 2006.02.05 BoBo](https://lyjhc.com/wp-content/themes/puock/timthumb.php?w=120&h=80&a=c&zc=1&q=90&src=https://lyjhc.com/wp-content/uploads/2025/02/litu2970.webp)


